Full Console? How to Add Storage to PS5, Xbox Series X/S & Switch 2
Tired of deleting games to make room for new ones? Your console storage doesn't have to be a constant battle. Learn how to expand PS5, Xbox Series X/S, and Nintendo Switch 2 storage with step-by-step instructions designed for gamers who value clarity over tech speak.

Affiliate/Advertisement Notice: This article contains affiliate links and sponsored content. We earn a small commission when you purchase through these links, which helps us keep Silver Gamers running.
That game from your backlog is finally on sale and the kids are at their friends house over the weekend. You're finally able to have a play session and then it happens: "Cannot start the application. Not enough free space." Your console storage is full.
You've already deleted three games you loved just to make room for new ones and you're tired of choosing which games to keep and which to sacrifice. Are you doing something wrong, because how on earth do people fit more than five games on these things?
Welcome to today's challenges as a gamer. Modern games are absolutely massive—we're talking 60-150GB for single titles. This is why your console's built-in storage fills up so shockingly fast. A PS5's advertised 825GB becomes 667GB of usable space in reality. Download Call of Duty (200GB), Red Dead Redemption 2 (150GB), and a few smaller games, and your console's storage is already full.
The good news is that expanding your console storage is far easier than you might think, and you have solid options for every budget and technical comfort level (We'll still spare you the really funky stuff that involves safety goggles, soldering irons and Microscopes...).
This guide walks you through exactly how to add storage to your PlayStation 5, Xbox Series X/S, or Nintendo Switch 2—with clear instructions, honest product recommendations, and none of the jargon that makes tech guides so frustrating.
By the end, you'll hopefully never see that dreaded "storage full" message again (Well, at least not as often... promise!).
Quick Navigation: Find Your Solution
PlayStation 5 owners: Jump to PS5 storage expansion options →
Xbox Series X/S owners: Jump to Xbox expandable storage solutions →
Nintendo Switch 2 owners: Jump to expanding Nintendo Switch storage →

Understanding Your Storage Options: A Simple Breakdown
Before we dive into platform-specific instructions, let's understand the four main types of storage expansion available. Don't worry—we'll explain each in plain English.

Internal SSD Expansion (PS5 Only)
What it involves: Adding an M.2 SSD (a type of solid-state drive) inside your PS5 console.
The Pros: Works exactly like your console's built-in storage. Games run at full speed with no compromises. Once installed, you'll forget it's an add-on—it just works.
The Cons: Requires you to open your console (though Sony designed this to be user-accessible). You'll need to buy a specific type of SSD that meets Sony's requirements (spoiler: they're not the cheapest option).
Best for: Tech-comfortable gamers who want the best performance and don't mind a 20-minute installation process.

Official Expansion Cards (Xbox Only)
What it is: Seagate Storage Expansion Cards that slot into the back of your Xbox Series X or S. Think of it like those old memory cards for PlayStation 2, but faster and with terabytes of storage.
The appeal: This is genuinely the easiest hardware upgrade in gaming history. Slide it in, click, done. Works exactly like your internal storage with zero compromise.
The catch: There are only two officially licensed options (Seagate and Western Digital), and they are very expensive. You're paying for convenience and guaranteed compatibility.
Best for: Anyone who wants Xbox expandable storage without any fuss whatsoever. This is the most stress-free option available for Xbox owners.
MicroSD Cards (Nintendo Switch/Switch 2)
What it is: Those tiny SD cards you might use in cameras or phones, but specifically for gaming.
The Pros: Cheap, easy to install (just slide it in), and available in huge capacities. Takes literally two minutes to set up.
The Cons: Games load slightly slower from SD cards compared to internal storage. We're talking seconds, not minutes, but it's noticeable in some titles.
Ideal for: Basically every Switch owner. Honestly, if you don't have a microSD card in your Switch, you're missing out on the console's full potential.

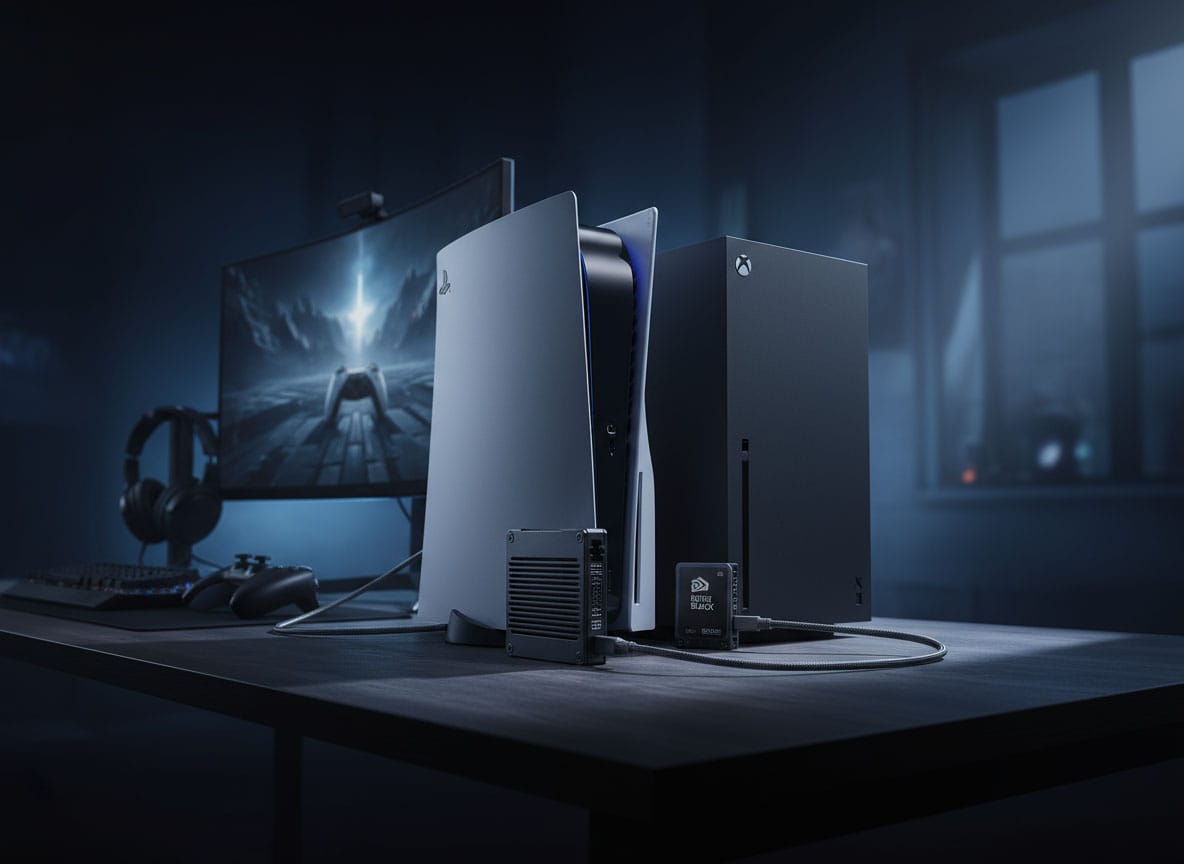
External Hard Drives/SSDs (All Consoles)
What it is: A USB drive that plugs into your console—exactly like plugging a USB stick into your computer.
The appeal: Very Affordable, massive capacity options (up to 8TB if you want), portable between consoles, and installation is literally just "plug it in."
The downside: You can't play current-generation games directly from external storage on PS5 or Xbox (though you can store them there and transfer them to internal storage when needed). The Nintendo Switch on the other hand, lets you play from external storage ( But since you can already stock up on storage via MicroSD cards, this is rather unpractical).
Best for: Budget-conscious gamers, people with slow internet or anyone who wants a massive archive for their games.
Storage Options Comparison
Here's how these options stack up against each other:
| Storage Type | Difficulty | Price Range | Speed | Works Like Internal Storage? |
|---|---|---|---|---|
| PS5 M.2 SSD | Moderate | £120-180 | Fastest | Yes – plays all games |
| Xbox Expansion Card | Very Easy | £90-320 | Fast | Yes – plays all games |
| Switch microSD | Very Easy | £25-120 | Moderate | Yes – plays all games |
| External HDD | Very Easy | £50-100 | Slow | No – storage only for next-gen games |
The key insight for PS5 owners: If the idea of opening your console makes you nervous, external drives and expansion cards offer brilliant alternatives. There's no shame in choosing the easier path—smart gamers work with their comfort level, not against it.
PS5 Storage Expansion: Your Complete Options
The PS5 offers two distinct paths for expanding storage, each with different advantages. Let's explore both thoroughly.

Option A: Internal M.2 SSD Installation (Best Performance)
This is the "proper" PS5 storage expansion method—adding internal storage that works exactly like your console's built-in drive. Games run at full speed, and once installed, you'll never think about it again.
What You'll Need
- Compatible M.2 SSD (specific requirements below)
- Small Phillips head screwdriver (the kind you'd use for glasses or electronics)
- 20-30 minutes of your time
- A well-lit workspace where you won't lose tiny screws
Understanding M.2 SSD Requirements
Sony requires SSDs to meet specific standards. Don't panic—we'll recommend exact models that work. But here's what you're looking for if you want to shop yourself:
- Form factor: M.2 Type 2280 (this is the physical size)
- Interface: PCIe Gen4 x4 (this is the connection type)
- Read speed: 5,500 MB/s minimum (this ensures games load properly)
- Capacity: 250GB to 4TB (we recommend 1TB or 2TB for best value)
- Heatsink: Required, but most SSDs include one now
If those specs look like gibberish, don't worry—just buy one of our recommended models below.
Recommended M.2 SSDs for PS5
Best Overall: Samsung 990 Pro
- 1TB: £110-130 | $120-140
- 2TB: £170-190 | $180-200
- Why it's great: Industry-leading reliability, comes with heatsink, 7,450 MB/s read speeds
- Buy Samsung 990 Pro on Amazon
Best Value: WD_BLACK SN850X
- 1TB: £95-115 | $100-120
- 2TB: £150-170 | $160-180
- Why it's great: Excellent performance for less money, reliable brand, includes heatsink
- Buy WD_BLACK SN850X on Amazon
Budget Pick: Crucial T500
- 1TB: £85-100 | $90-110
- 2TB: £130-150 | $140-160
- Why it's great: Meets all PS5 requirements at the lowest price, still very reliable
- Buy Crucial T500 on Amazon
How much capacity do you need?
- 1TB: Holds approximately 10-20 games (mixture of sizes)
- 2TB: Holds approximately 30-40 games (mixture of sizes)
- 4TB: Holds 60+ games (probably overkill unless you're a Game Pass power user)
For most gamers, 1TB provides plenty of space. If you're a heavy downloader or hate managing storage, go for 2TB.
Step-by-Step Installation Guide
Don't worry—this looks more complicated written out than it actually is. You've got this.
Step 1: Prepare Your Workspace
Turn off your PS5 completely. Don't use rest mode—we need it fully powered down. Press and hold the power button until you hear a second beep (about 7 seconds). The indicator light will blink a few times, then turn off.
Unplug everything: power cable, HDMI, any USB devices. Clear a space on a table with good lighting. Lay down a towel or soft cloth to protect your PS5's finish.
Step 2: Remove the Side Panel
This is the step that intimidates people, but Sony actually designed it to be easy. Here's how:
- Position your PS5 so the front (with the ports) faces left
- Place your PS5 on its side with the PS logo facing up
- Lift the top-right corner of the panel slightly
- Slide the entire panel away from you (toward the left side)
- The panel will release with a satisfying click
Pro tip: Don't force anything. If it's not sliding easily, you haven't lifted it quite enough. It should feel smooth once you've got the angle right.
Step 3: Locate and Open the Expansion Slot
You'll see a rectangular metal cover held by a single screw. It's clearly labeled and impossible to miss.
- Use your Phillips head screwdriver to remove the screw
- Keep this screw somewhere safe—you'll need it again
- The metal cover lifts off completely
Step 4: Remove the Spacer and Screw
Inside the expansion bay, you'll see a small screw and a plastic spacer (it looks like a tiny standoff). These need to be adjusted for your SSD's length.
- Unscrew the small screw at position "110" (it's labeled)
- Remove the plastic spacer underneath
- Move both to position "80" (again, clearly labeled)
- Screw them back in snugly but not too tight
This positions the mounting point for a 2280-sized SSD (the standard size).
Step 5: Install Your M.2 SSD
Here's where it all comes together:
- Hold your SSD at a 30-degree angle
- Line up the notches (they only fit one way—you can't install it backward)
- Gently slide the SSD into the slot until fully inserted
- Press down on the SSD's far end until it's flat
- Secure it with the screw you moved earlier
Important: If you have to force it, something's wrong. The SSD should slide in smoothly and press down easily. The heatsink should face up, and there should be a small gap between the SSD and the PS5's internal components.
Step 6: Replace the Cover and Panel
Almost there:
- Put the metal expansion cover back on
- Replace the screw that holds it
- Slide the side panel back on (reverse of removal)
- You'll hear it click into place
Step 7: Format the Drive
Plug everything back in and turn on your PS5. The console will automatically detect your new SSD and prompt you to format it. This process:
- Takes about 2-3 minutes
- Erases any data on the SSD (which should be empty anyway)
- Prepares it for use as PS5 storage
Follow the on-screen prompts—it's straightforward. Once complete, go to Settings → Storage to confirm your new capacity shows up.
You did it! Your PS5 now has significantly more storage, and games will run exactly as fast as they do from your internal drive.
Common Installation Mistakes to Avoid
Installing while in rest mode: Always turn the console completely off. Rest mode means it's still powered, which is unsafe for hardware installation and might damage your console.
Forgetting the heatsink: If your SSD didn't come with a heatsink, you need to buy one separately. The PS5 generates significant heat, and an SSD without a heatsink will thermal throttle (slow down) or fail.
Forcing the SSD: If it's not sliding in easily, check the orientation. The notch in the SSD must line up with the slot's key. It only fits one way.
Over-tightening screws: Hand-tight is enough. You're dealing with small screws in plastic—over-tightening can strip threads.
Read our PS5 SSD FAQs for more infos

Option B: External SSD/HDD (The No-Fear Option)
If the thought of opening your PS5 gives you sweaty palms, external storage offers an alternative. Yes, there are limitations, but it's still incredibly useful for PS5 storage expansion.
What You'll Need
- USB 3.0 (or newer) external drive
- A USB port on your PS5 (you have several)
- 5 minutes
That's it. No screwdrivers, no disassembly, no risk.
How External Storage Works on PS5
You cannot play PS5 games directly from an external drive. However, you can store them there and transfer them back to internal storage when you want to play. This is much faster than re-downloading (10-15 minutes vs. hours).
Your best bet: Keep your current rotation of PS5 games on internal storage, archive everything else to your external drive. When you want to play an archived game, transfer it back to internal (takes 10-20 minutes depending on game size).
Recommended External Drives for PS5
Best Capacity: WD_BLACK P10 Game Drive
- Capacities: 2TB £70-80 ($80-90) | 4TB £100-120 ($110-130) | 5TB £130-150 ($140-160)
- Specifically designed for gaming, massive storage, reliable Western Digital brand
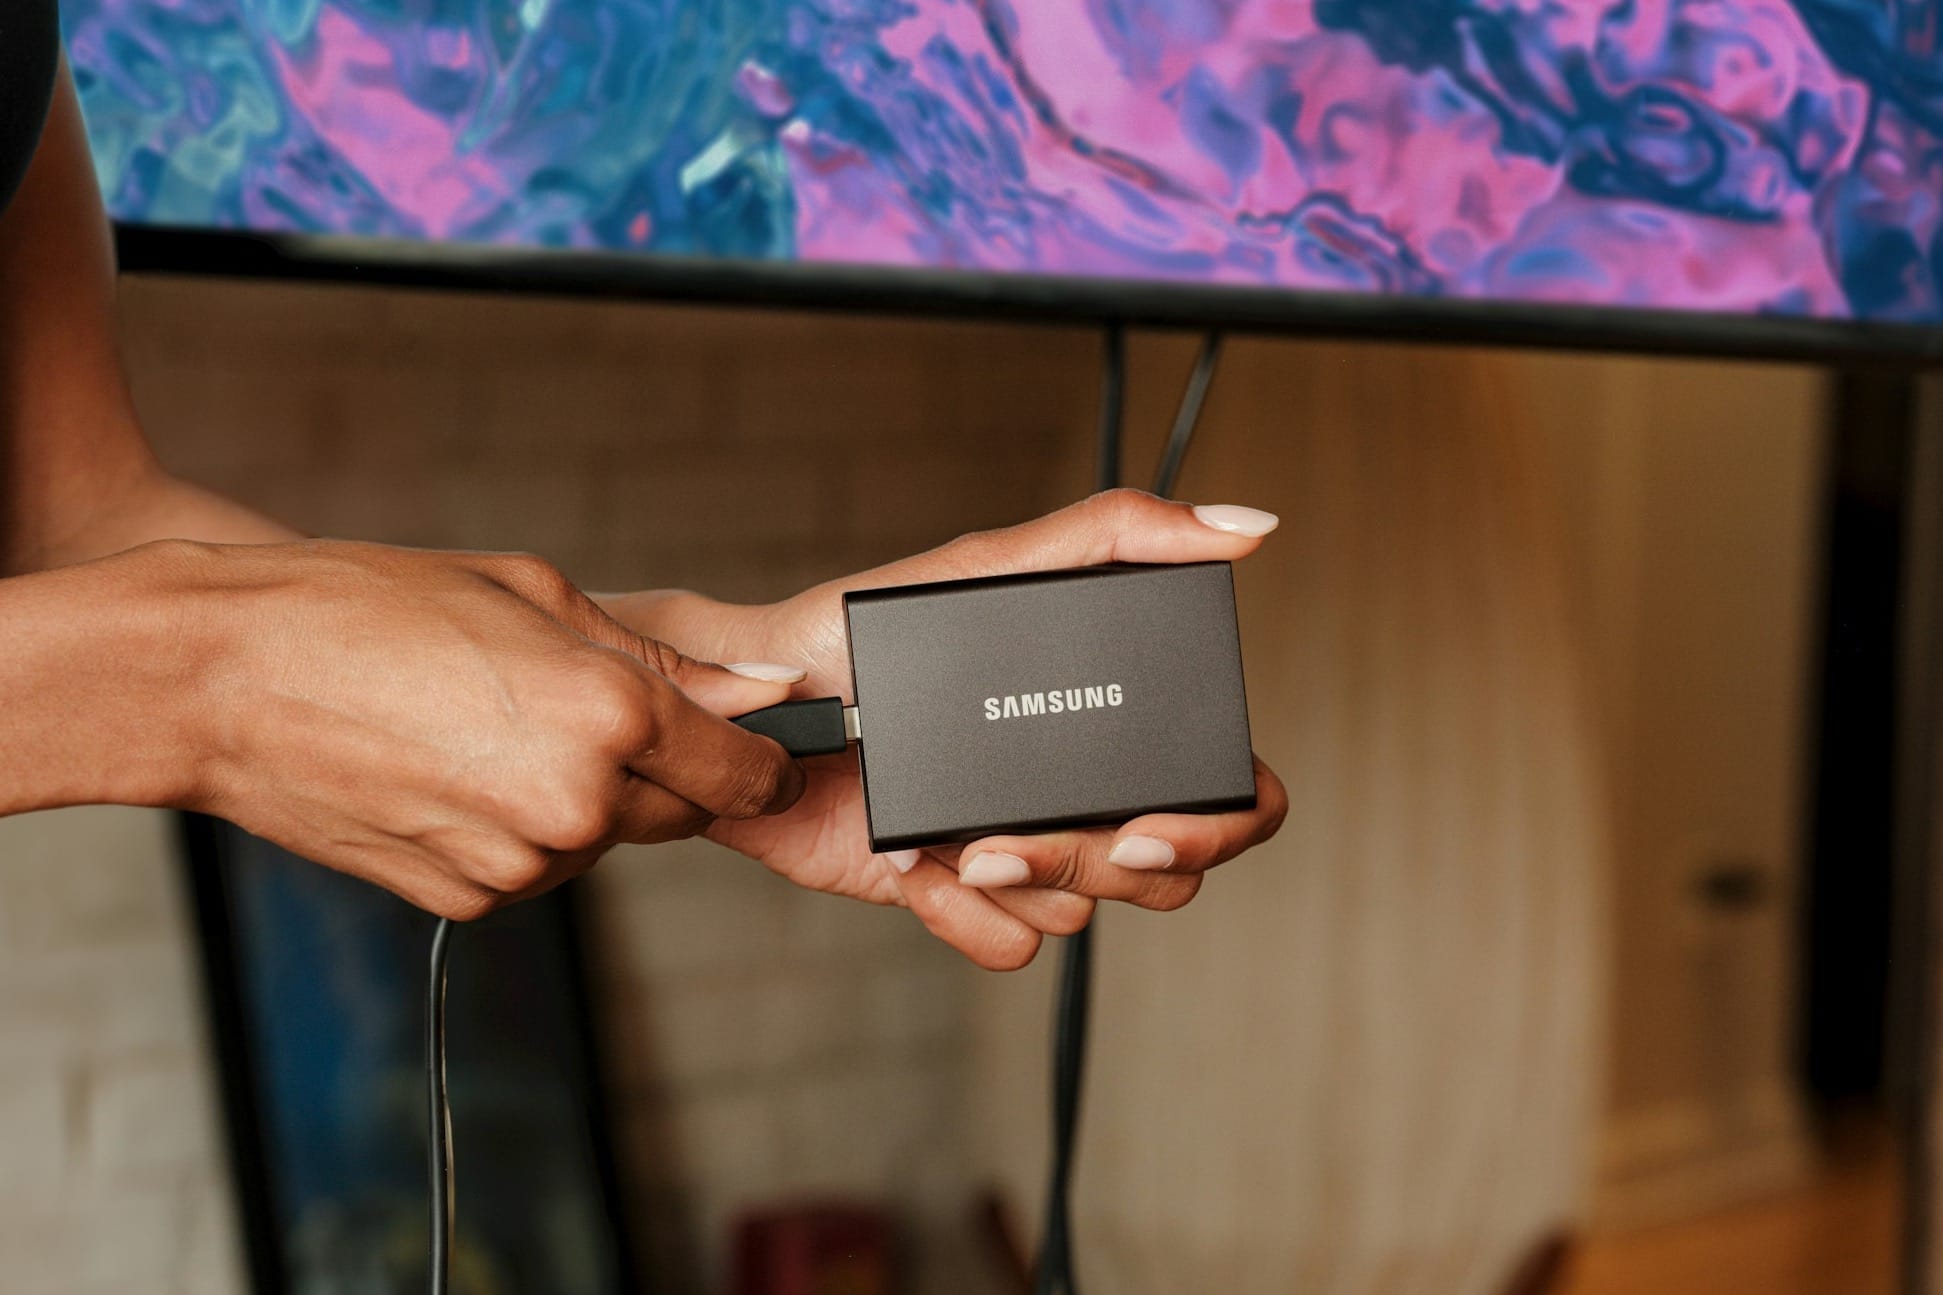
Fastest Option: Samsung T7 Portable SSD
- Capacities: 1TB £80-100 ($90-110) | 2TB £140-160 ($150-170)
- SSD means much faster transfers than HDD, compact and portable, durable
Budget Pick: Seagate Game Drive
- Capacities: 2TB £60-70 ($65-75) | 4TB £90-100 ($95-105)
- Affordable, does the job perfectly well, officially licensed by PlayStation
- Buy Seagate Game Drive on Amazon
HDD vs SSD—which should you choose?
External HDD (Hard Disk Drive):
- Cheaper per gigabyte
- Larger capacities available (up to 8TB)
- Slower transfer speeds (USB 3.0 HDDs max out around 120-130 MB/s)
External SSD (Solid State Drive):
- More expensive per gigabyte
- smaller form factor
- Smaller maximum capacities (usually 2TB max)
- Much faster transfers (400-500 MB/s typical)
- No moving parts = more durable
The verdict: For most Silver Gamers, a 2-4TB external HDD offers the best value. You get massive storage for a reasonable price, and the slower transfer speed only matters when you're moving games around (which you won't do constantly). If you transfer games frequently or want the fastest possible performance, splurge on an SSD.
How to Set Up External Storage on PS5
This is genuinely easy:
Step 1: Plug In Your Drive
Connect your external drive to one of the USB ports on the back of your PS5. The PS5 will automatically detect it.
Step 2: Format the Drive
When you first connect a new drive, your PS5 will prompt you to format it. This erases any data on the drive and prepares it for use as PS5 storage.
- Go to Settings → Storage → Extended Storage
- Select "Format as Extended Storage"
- Confirm (this takes 2-3 minutes)
Step 3: Choose which Games to Archive
After formatting, you can move games to your external storage:
- Go to Settings → Storage
- Select "Console Storage" to see your internal games
- Choose games to move
- Select "Move to Extended Storage"
The PS5 will transfer your selected games. This process happens in the background, so you can keep using your console.
Managing Storage Between Internal and External:
When you want to play a PS5 game that's on your external drive, you simply copy it over to your internal storage:
- Go to Settings → Storage → Extended Storage
- Select the game you want to play
- Choose "Move to Console Storage"
- Wait 10-30 minutes depending on game size
Pro tip: Move games overnight or while you're at work. Set it up, leave your PS5 on, and the game will be ready when you return.

Xbox Expandable Storage: The Easiest Option in Gaming
If there's one thing Microsoft got absolutely right with Xbox Series X and S, it's the Xbox expandable storage system. Let's explore your options.
Option A: Storage Expansion Card (Easiest Hardware Upgrade You Have Ever Done)
This is genuinely the most user-friendly hardware upgrade in gaming history. If you can plug in a USB stick, you can install Xbox expandable storage.
What You'll Need
- Seagate Storage Expansion Card for Xbox (choose your capacity)
- 30 seconds of your time
- The expansion slot on the back of your Xbox
That's it. No screwdrivers, no formatting, no setup process.
How the Expansion Card Works
The Seagate Storage Expansion Card is essentially more internal storage in a portable format. It works exactly like your Xbox's built-in SSD:
- Games run at full speed (no performance difference whatsoever)
- Automatic recognition (plug in, start playing immediately)
- Hot-swappable (you can remove and reinsert without turning off your Xbox)
- Portable (take your games to a friend's Xbox)
Microsoft partnered with select Manufacturers to create proprietary storage that matches the Xbox's internal SSD specifications exactly. That's why there are so few official options—but it's genuinely excellent.
Available Expansion Cards and Pricing
Seagate 1TB Expansion Card for Xbox Series X|S
- Price: £149-169 ($149-169)
- Storage: Holds 15-25 games (depending on sizes)
- Verdict: The sweet spot for most gamers. Enough space to avoid constant management
- Buy Seagate 1TB Expansion Card on Amazon
WD_Black 2TB C50 Storage Expansion Card
- Price: £289-319 ($279-309)
- Storage: Holds 30-50 games (depending on sizes)
- Verdict: Overkill for most players, but if you're a Game Pass hoarder, this ends storage anxiety forever
- Buy 2TB Card on Amazon
Installation Instructions
Ready? Here's the complete installation process:
- Locate the expansion slot on the back of your Xbox (it has a removable rubber cover)
- Remove the rubber cover and keep it somewhere safe
- Slide the expansion card into the slot (there's only one way it fits)
- Push until you hear/feel a click
- Done
Your Xbox will instantly recognize the card, and you can start installing games to it immediately. No formatting, no setup menus, no configuration.
To remove it later, press the small eject button next to the slot, and the card pops out slightly so you can pull it free.
Is It Worth the Price?
Let's address the elephant in the room: Xbox expansion cards are not exactly cheap: A 1TB card costs more than some AAA titles. While that is certainly a factor, here are our top reasons why they are still worth it:
- Convenience: If you can afford it, this is the single easiest storage upgrade you'll ever do. Zero technical knowledge required, zero installation anxiety, zero compromise on performance.
- Matches internal storage: Unlike external drives, you can play all Xbox Series X|S games directly from the expansion card at full speed. No transferring, no waiting, no management.
- Portable gaming library: If you own more than one Xbox in (potentially) more than one place, expansion cards make it very easy to take your entire game library with you.
If you can afford it and value convenience above all else, the Xbox expandable storage card is brilliant. If you're budget-conscious and don't mind a bit of storage management, external drives offer far better value.
Option B: External HDD/SSD (The Smart Budget Alternative)
External drives work differently on Xbox compared to PS5, but they're still incredibly useful for Xbox expandable storage on a budget. While you cannot play directly from external USB storage, you can store them on there and transfer them back to the console's internal storage when you want to play. Transfers are much faster than re-downloading.
The Smart Storage Strategy
Internal storage: Keep your current rotation of 4-6 Series X|S games here. These are the games you're actively playing.
External Storage: Store games you might return to, games you've finished but don't want to delete and your entire back catalog of Xbox One games. Even your screenshots and video clips find a home here.
The Backup Workflow:
- Download new games directly to the internal storage
- Whenever you finished a game or haven't played it a while, you either delete it or move it to external storage (frees up internal space)
- In the mood for some gaming? Take a look at your games library saved to external storage and transfer them back to internal storage(takes 10-20 minutes)
This approach gives you massive storage capacity for minimal cost, with the slight inconvenience of occasional transfers.
Recommended External Drives for Xbox Series X|S
Best Capacity Options: WD_BLACK P10 Game Drive
- Capacities: 2TB £70-80 ($80-90) | 4TB £100-120 ($110-130) | 5TB £130-150 ($140-160)
- Specially made for video gaming, massive storage, reliable brand
Fastest Option: Samsung T7 Portable SSD
- Capacities: 1TB £80-100 ($90-110) | 2TB £140-160 ($150-170)
- SSD have a much faster transfers than HDD, are more compact and therefore highly portable. The price tag is a bit higher, though.
Budget Pick: Seagate Game Drive for Xbox Series X|S
- Capacities: 2TB £60-70 ($65-75) | 4TB £90-100 ($95-105)
- Affordable and does the job perfectly well, comes in a design that fits the Xbox Series X perfectly
- Buy Seagate Game Drive on Amazon
HDD vs SSD—which should you choose?
External HDD (Hard Disk Drive):
- Cheaper per gigabyte storage
- Larger capacities available, for a cheaper price (up to 8TB)
- Slower overall transfer speeds compared to SSDs (USB 3.0 HDDs max out around 120-130 MB/s)
External SSD (Solid State Drive):
- Generally more expensive per gigabyte
- smaller form factor, high portability
- Smaller maximum capacities
- Much faster transfers (400-500 MB/s typical)
- No moving parts = more durable ( It won't break if you drop it)
The verdict: For most Silver Gamers, a portable 2-4TB HDD offers the best overall value - You get lots of game storage for a low price, and the slower transfer speeds don't matter that much if you don't move games around on daily basis. If you transfer games more frequently or want the fastest possible performance, that's when an SSD makes sense.
Setting Up External Storage on Xbox
Step 1: Connect the Drive
Plug your external drive into any USB port on your Xbox (the back ports are preferable to keep cables tidy).
Step 2: Format the Drive
Your Xbox will detect the new drive and ask if you want to format it:
- Press the Xbox button to open the guide
- Go to Profile & system → Settings → System → Storage
- Select your external drive
- Choose "Format storage device"
- Select "Change installation locations" if you want new downloads to go to external storage
- Confirm formatting (takes 2-3 minutes)
Step 3: Manage Your Storage
To move games between internal and external storage:
- Press the Xbox button
- Go to "My games & apps"
- Highlight a game, press the menu button (three lines)
- Select "Manage game and add-ons"
- Choose "Move" or "Copy"
- Select destination (internal or external)

Expanding Nintendo Switch 2 Storage: The Two-Minute Upgrade
Nintendo Switch 2 storage expansion is the easiest console storage upgrade you'll encounter. If you can slide a card into a slot, you can do this.
Why You Need a MicroSD Card
Nintendo Switch 2 comes with 256GB of internal storage (approximately 230GB usable after system files). That sounds decent until you realize:
- The Legend of Zelda: Tears of the Kingdom: 18GB
- Mario Kart World: 7GB
- Super Mario Bros. Wonder: 6GB
- Tales of the Shire: 8GB
- Baldur's Gate 3: 100GB+ (yes, on Switch 2)
Download a dozen games and you're full. Plus, digital game sales are so frequent on Switch that you'll be constantly tempted to download more.
Thankfully, expanding the Nintendo Switch's storage costs as little as £25-35 ($25-$35) and takes two minutes.
Understanding MicroSD Card Specifications
Before we get to recommendations, let's demystify the specs. MicroSD cards have various markings that indicate speed and capacity.
Capacity:
- microSDHC: Up to 32GB (avoid these—they're too small and slow for modern gaming)
- microSDXC: 64GB to 2TB (this is what you want)
Speed Class (the important bit):
- UHS-I (U1 or U3): Required minimum for Switch 2
- U3 marking: Means 30 MB/s minimum write speed (recommended)
- V30 marking: Video speed class (also 30 MB/s)
- Read speed: How fast data loads from the card (affects game loading times)
- Write speed: How fast data saves to the card (affects download/install speeds)
Nintendo Switch 2 owners should look for these specs:
- UHS-I interface or better
- U3 or V30 marking minimum
- Read speeds of 80-100 MB/s
- Stick to reputable brands (SanDisk, Samsung, Kingston)
Recommended MicroSD Cards for Switch 2
Best Overall: SanDisk Extreme microSDXC
- 256GB: £30-35 | $35-40
- 512GB: £55-65 | $60-70
- 1TB: £105-120 | $115-130
- Speeds: Up to 190 MB/s read, 130 MB/s write
- Why it's great: Fast, reliable, perfect balance of performance and value
- Buy SanDisk Extreme on Amazon
Best Value: Samsung EVO Select
- 256GB: £25-30 | $28-33
- 512GB: £45-55 | $50-60
- 1TB: £90-105 | $95-110
- Speeds: Up to 130 MB/s read, 80 MB/s write
- Why it's great: Excellent price-to-performance ratio, Samsung reliability
- Buy Samsung EVO Select on Amazon
Budget Pick: SanDisk Ultra microSDXC
- 256GB: £20-25 | $22-27
- 512GB: £40-48 | $43-50
- 1TB: £80-95 | $85-100
- Speeds: Up to 150 MB/s read
- Why it's great: Affordable, does the job, from a trusted brand
- Buy SanDisk Ultra on Amazon
How Much Storage Do You Actually Need?
256GB microSD:
- Total capacity with internal: ~480GB
- Holds: 25-35 games (mixture of sizes)
- Best for: Casual players who buy mostly physical games
- Cost: £25-35
512GB microSD (Recommended):
- Total capacity with internal: ~740GB
- Holds: 40-60 games (mixture of sizes)
- Best for: Most Switch 2 owners who buy some digital, some physical
- Cost: £45-65
1TB microSD:
- Total capacity with internal: ~1.2TB
- Holds: 70-100+ games (mixture of sizes)
- Best for: All-digital buyers or Nintendo Online subscribers who download everything
- Cost: £90-120
The sweet spot: For most Silver Gamers, 512GB offers the best balance. You'll have plenty of space without overspending, and you won't need to manage storage constantly.
How to Install a MicroSD Card in Switch 2
This is genuinely one of the easier hardware installations.
Step 1: Power Down Your Switch 2 (Optional)
You can technically insert a microSD card while your Switch is on, but it's safer to power down first:
- Press and hold the power button for 3 seconds
- Select "Power Options"
- Choose "Turn Off"
Step 2: Locate the MicroSD Card Slot
On the Switch 2, the microSD card slot is located:
- Under the kickstand on the back of the console
- Lift the kickstand gently
- You'll see a small slot with "microSD" labeled near it
Step 3: Insert the MicroSD Card
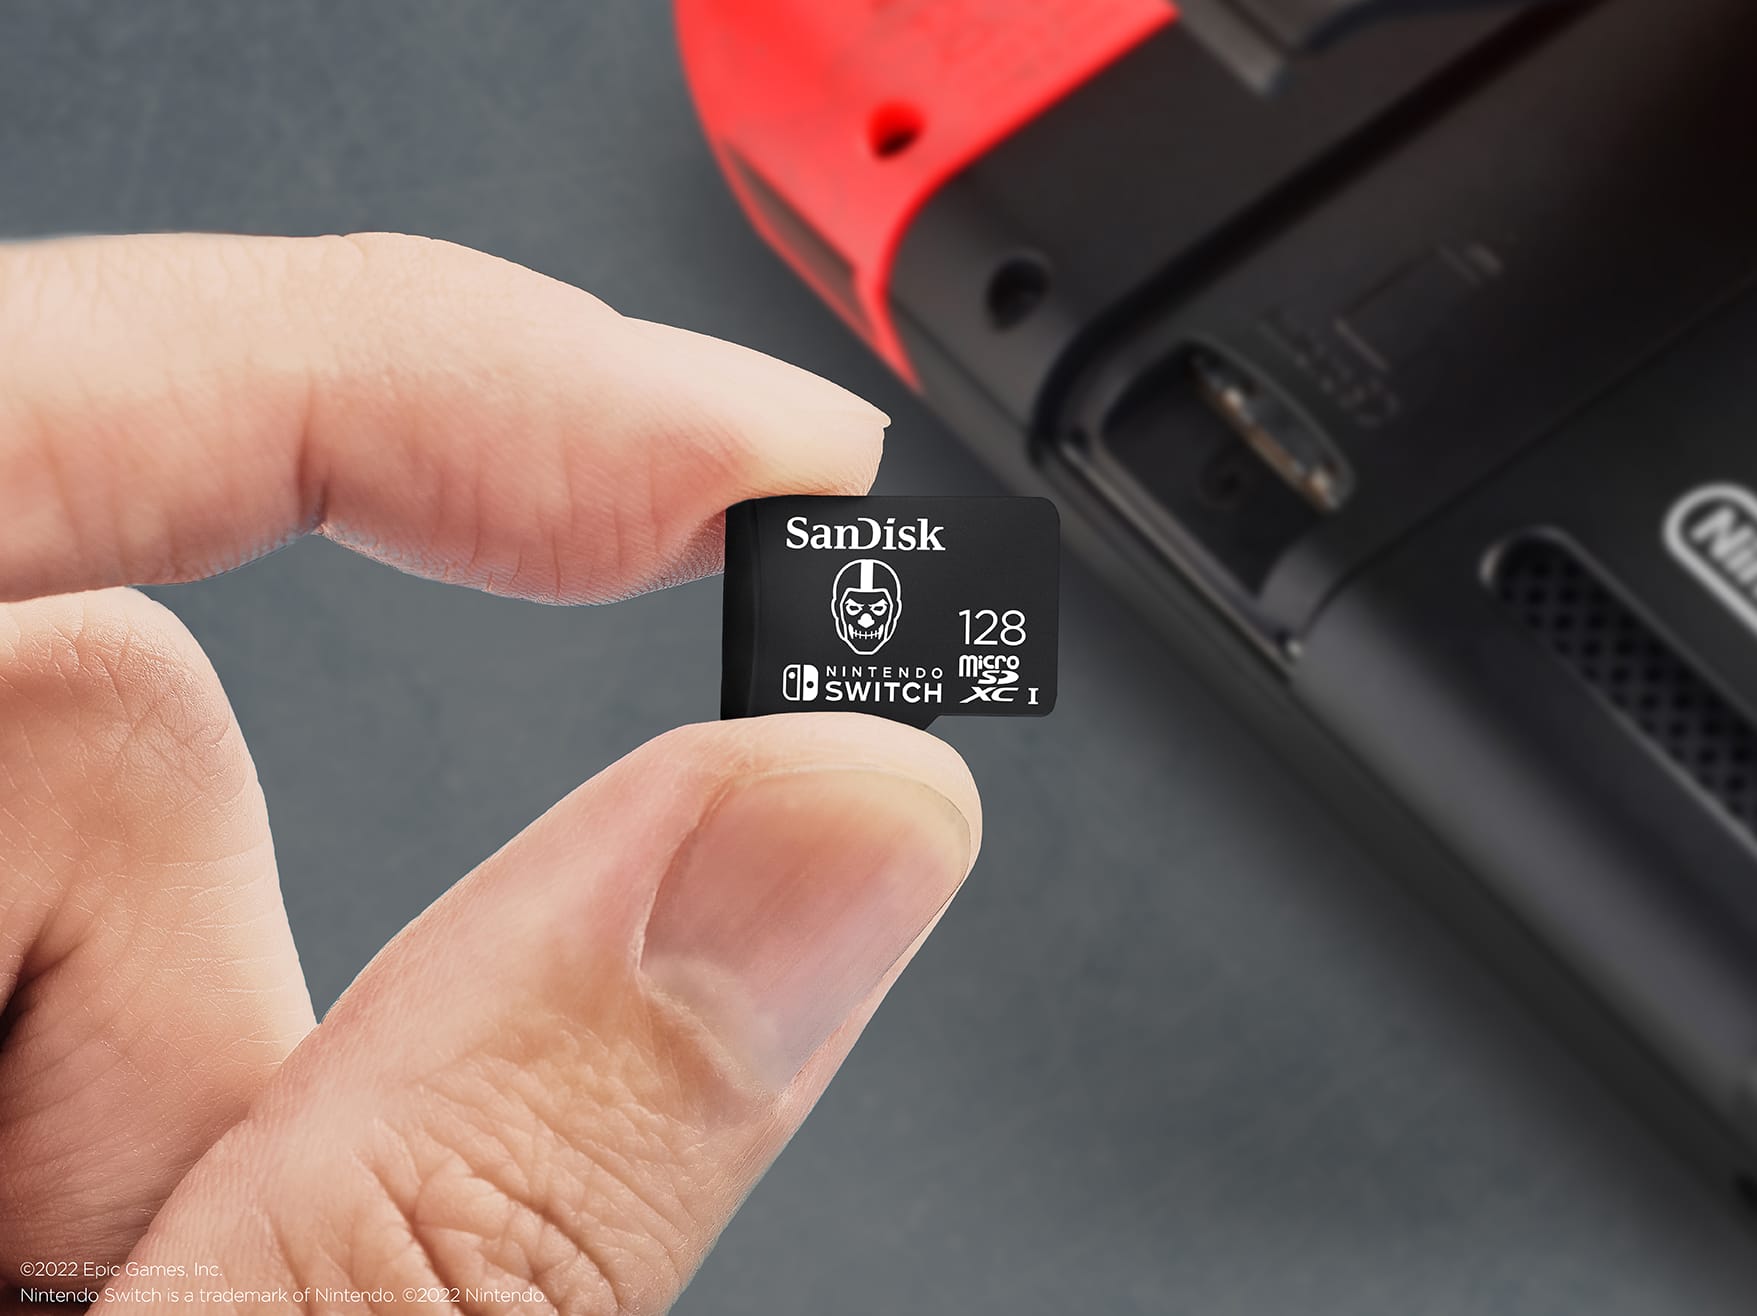
- Hold the microSD card with the label facing away from the Switch's screen (See image)
- Gently push the card into the slot
- Push until you hear/feel a small click
- The card is now locked in place
That's it. Close the kickstand. Turn on your Switch.
Step 4: Format the Card (First Time Only)
When you turn on your Switch with a new microSD card inserted, it will prompt you to format the card:
- Select "Yes" when asked to format
- The process takes 30-60 seconds
- Once complete, your Switch is ready to use the expanded storage
To verify it's working:
- Go to System Settings
- Select "Data Management"
- Check "Total Space" – you should see your internal storage + microSD capacity
Using Your Expanded Storage
The Switch 2 handles storage automatically and intelligently:
Where games are installed:
- New downloads automatically go to your microSD card if there's space
- Physical game cartridge data (updates, DLC) installs to microSD
- Screenshots and videos save to internal storage by default (but you can change this)
Managing storage manually:
- Go to System Settings → Data Management
- You'll see what's on internal vs microSD storage
- You can move data between them if needed
Performance notes:
- Most games load within 1-3 seconds slower from microSD vs internal (barely noticeable)
- Some massive games (Tears of the Kingdom, Baldur's Gate 3) might have slightly longer load times (depending on your MicroSD cards speed rating)
- Overall gameplay is identical—you won't notice a difference during actual play
External Storage Strategy: Smart Management for All Consoles
Regardless of which console you own, having a smart strategy for managing storage makes gaming life much easier. Here is our three tiered System to optimise your consoles storage:
The Three-Tier System
Think of your gaming storage like a bookshelf with different sections:
Tier 1: Current Rotation (Internal Storage)
This is your active gaming shelf—the games you're playing right now or will play this week. Keep this space reserved for:
- 3-5 games you're actively working through
- Multiplayer games you jump into frequently
- Any game you might want to play on a whim
For PS5/Xbox: Your current-gen games that must be on internal/expansion card to play
For Switch 2: Your most-played games for fastest loading
Tier 2: The Archive (External HDD/SSD)
This is your deep storage—games you've finished, games you might return to, or games you're taking a break from:
- Completed single-player games you might replay someday
- Games you're taking a break from but want to keep
- Last-gen games (Xbox One/PS4) you still occasionally play
For PS5/Xbox: Quick transfer gets these back to playable status in 10-20 minutes
For Switch 2: Not applicable (microSD is your primary expanded storage)
Tier 3: The Cloud (Re-download When Needed)
These are games you can safely delete:
- Game Pass/PS Plus games (you can always re-download while subscribed)
- Games you've 100% completed and won't replay
- Games you might playagain, some distant day (We all have those!)
Your game saves are backed up to the cloud (on all modern consoles), so deleting the game doesn't delete your progress.
Monthly Storage Maintenance
Once a month, spend 5 minutes managing your storage:
Quick Storage Checkup:
- Review current rotation: Are there games on your internal storage you haven't played in weeks? Move them to external or delete them.
- Clear captures: Screenshots and videos accumulate quickly. Export the ones you want to keep, delete the rest.
- Update archived games: If a game on external storage receives a major update, move it to internal, let it update, then move it back. This ensures when you do want to play it, it's ready.
- Check for finished games: Completed a game this month? Move it to external or delete it entirely if you're done.
Understanding Cloud Saves
One thing that terrifies new gamers: "If I delete this game, do I lose my progress?" No. Here's how saves work on modern consoles:
PlayStation 5:
- Saves automatically to PlayStation Plus Cloud Storage (if you have PS Plus)
- Saves also on your console's internal storage (separate from games)
- Deleting a game never deletes saves
- You can manually back up saves to USB drive for extra safety
Xbox Series X/S:
- Saves automatically sync to Xbox Cloud - This happens whether or not you have Game Pass
- Deleting a game never deletes saves
- Re-download a game months later and your progress is waiting
Nintendo Switch 2:
- Saves stay on internal console storage (not your microSD card)
- Nintendo Switch Online backs saves to cloud
- Deleting a game from microSD never touches saves
- Some games don't support cloud saves (Pokémon, Animal Crossing) for anti-cheat reasons
You can safely delete games without losing progress. When you re-download, your saves are right where you left them.
Expanding your console storage isn't some advanced technical task reserved for young tech enthusiasts. It's a normal, expected part of modern gaming—and it's genuinely easier than you think.
The hardest part? Making the decision to do it.
Once you've chosen your solution and followed the steps in this guide, you'll wonder why you waited so long. No more deleting games you love. No more storage anxiety. No more choosing between what to keep and what to sacrifice.
Just gaming. The way it should be.
Frequently Asked Questions
Common Problems and Solutions
Even with the best preparation, you might encounter issues. Here's how to solve the most common problems.
Why is my drive not recognized
You've plugged in external storage or installed an M.2 SSD, but your console doesn't see it.
Solutions:
For external drives:
- Try a different USB port (back ports work better than front)
- Ensure the drive is getting power (some drives need separate power adapters)
- Check the USB cable—try a different cable if you have one
- Format the drive on a PC first as exFAT, then connect to console
- Update your console's system software
For PS5 internal M.2:
- Verify the SSD meets PS5 requirements (check our recommended list)
- Ensure it's fully inserted (should be flat, not at an angle)
- Check that you moved the screw to the correct position (usually 80mm)
- Try reseating the SSD (remove and reinstall)
- Verify the heatsink isn't preventing full insertion
For Xbox expansion card:
- Remove and reinsert (should click firmly into place)
- Clean the contacts gently with a microfiber cloth
- Try the card in a different Xbox if possible (verifies card vs console issue)
- Check for Xbox system update
How Do I Know What's Taking Up Space?
PlayStation 5:
- Go to Settings → Storage
- You'll see a breakdown: Games and Apps, Media, Saved Data, Other
- Select "Games and Apps" to see individual game sizes
- Sort by size to find the biggest space hogs
Xbox Series X/S:
- Press Xbox button → Profile & system → Settings → System → Storage
- Select your storage device
- Choose "View storage" to see what's installed
- Sort by size to identify large games
Nintendo Switch 2:
- Go to System Settings → Data Management
- Select "Manage Software"
- You'll see all games and their sizes
- Sort by size to find what's taking up most space
Pro tip: Delete games you've finished and aren't replaying. Your saves are safe, and you can always re-download the game if nostalgia strikes.
Console Says Storage Is Full But I Deleted Games
Causes and solutions:
Capture gallery bloat: Your screenshots and videos take up surprising amounts of space.
- PS5: Go to Settings → Storage → Media Gallery → Delete unwanted captures
- Xbox: My Content → Captures → Manage captures → Delete
- Switch 2: Album → Select multiple captures → Delete
Game updates stored separately: Sometimes deleted game files leave behind update data.
- Restart your console (full power down, not rest mode)
- Check storage again after restart
- Some orphaned data may clear automatically
Cloud sync taking space: On Xbox, cloud saves download when you start games.
- This is minimal but can add up
- Check Settings → System → Storage for details
Reserved space: Consoles reserve space for system operations and updates.
- This is normal and can't be freed
- Typically 50-100GB depending on console
What if I delete something I need?
You won't permanently lose anything. Games can be re-downloaded. Saves are backed up. You're not making irreversible decisions—you're just managing space.
I paid for these games. Deleting them feels like waste
Deleting a game doesn't mean you lose ownership. Think of it like packing books into storage—you still own them, they're just not on the shelf right now. Digital games are tied to your account forever.
What if I want to play the game in the future?
Then you'll re-download it. Yes, it takes time, but modern internet speeds make this far less painful than it was a decade ago. A 50GB game might take 1-2 hours to download—less time than you'd spend worrying about storage management.
I can't decide what to delete
Use the 90-day rule: If you haven't played a game in 90 days, move it to external storage or delete it. If you haven't played it in 6 months, delete it entirely. You can always get it back.
Do I really need more storage?
You probably do:
- Play more than 5-6 modern AAA games
- Subscribe to Game Pass, PS Plus, or Nintendo Online and download multiple games
- Constantly delete games to make room for new ones
- Play large online games (Call of Duty, Destiny 2) that receive frequent updates
- Buy digital games during sales and want to keep them installed
You might not need it:
- Primarily buy physical games and don't download many
- Only play 2-3 games at a time
- Have fast internet and don't mind re-downloading games
- Your internal storage still has 200GB+ free
Will external storage slow down my console?
For PS5 and Xbox Series X|S:
- You cannot play current-gen games directly from external storage (too slow)
- You can store them there and transfer them back (which is much faster than re-downloading)
- Older games (PS4/Xbox One) can play from external with minimal slowdown
For Nintendo Switch 2:
- Games load 1-3 seconds slower from microSD vs internal
- During gameplay, there's no performance difference
- Most players don't notice the difference
The simple version: Internal storage is fastest, but external storage is incredibly useful for archives and older games.
Can I use the same external drive for multiple consoles?
Not simultaneously. Each console formats external drives in its own way:
PlayStation 5: Formats drives as "Extended Storage" (proprietary format) Xbox Series X/S: Formats drives as "Game Storage" (different proprietary format) Switch 2: Formats microSD as FAT32 or exFAT
However, you can:
- Reformat a drive and move it between consoles (erases all data on the drive)
- Buy separate drives for each console (most practical solution)
- Use a large external drive partitioned for multiple purposes (advanced users only)
The Silver Gamers recommendation: If you own multiple consoles and want external storage for each, buy separate drives. It's less expensive than the frustration of constantly reformatting and re-downloading.
What if I fill up the expanded storage?
Short-term:
- Delete games you've finished and won't replay
- Move rarely-played games to cloud (delete locally, re-download when needed)
- Clear your capture gallery (screenshots and videos add up)
Long-term:
- Buy additional external storage (you can have multiple drives)
- Upgrade to larger capacity (sell or repurpose your smaller drive)
- Accept that storage management is part of modern gaming
Most gamers with 1-2TB of total storage don't run into space issues frequently. If you're constantly full even with expanded storage, you might be a gaming hoarder (and that's okay—it just means you need even more space).
Can I upgrade storage on Xbox Series S?
Yes—exactly the same options as Xbox Series X:
Official expansion card: Same Seagate cards work identically on Series S External HDD/SSD: Same setup process and functionality
Series S consideration: The smaller 512GB internal storage (364GB usable) makes expansion even more important for Series S owners. If you play more than 4-5 games at a time, you'll want expanded storage sooner rather than later.
How often do I need to replace storage? / Can storage break over time?
Quality storage should last 5-10+ years:
M.2 SSDs (PS5 internal):
- Rated for hundreds of terabytes written over their lifetime
- For gaming use, should last the entire console generation
- Typical warranty: 5 years
Official expansion cards (Xbox):
- Should last the entire console lifetime
- Typical warranty: 3 years
External HDDs:
- Can fail more frequently (moving parts)
- Average lifespan: 3-5 years of regular use
- Keep receipts for warranty claims
MicroSD cards:
- Can fail more frequently than SSDs
- Quality brands: 5-7 years typical
- Budget brands: May fail within 2-3 years
- Always keep receipts and backup important saves
Signs storage is failing:
- Games failing to install or load
- Frequent corruption errors
- Unusual noises (HDDs only—clicking or grinding)
- Drastically slower performance
- Console no longer recognizing the drive
Prevention:
- Buy from reputable brands
- Keep receipts for warranty claims
- Don't expose storage to extreme temperatures
- Safely eject external drives (don't just unplug)
- Keep firmware updated when applicable
Can I transfer storage between old and new consoles?
Yes, with some limitations:
External drives:
- PS4 to PS5: Yes, plug in your PS4 external drive and access PS4 games immediately
- Xbox One to Series X|S: Yes, plug in and play Xbox One games immediately
- Original Switch to Switch 2: Not recommended—formatting is different, better to use a new microSD card
Internal storage:
- Cannot be transferred (stays with the original console)
- PS5 M.2 SSD could theoretically be moved, but you'd need to reinstall and lose everything on it
Cloud saves:
- Transfer automatically if you're signed into your account
- PS Plus/Xbox Live maintains your save data
- Nintendo Switch Online backs up most saves
The practical approach: Keep your old console's storage with that console. When upgrading, start fresh with new storage for your new console. Your game saves transfer via cloud, so you're not losing progress.
PS5 SSD Upgrades
What if I break something?
You won't. Sony engineered this expansion slot for regular users, not technicians. The hardest part is removing the side panel the first time, and even that's designed to be user-friendly. Thousands of people your age have done this successfully.
I've never opened electronics before
If you've ever changed batteries in a TV remote or swapped out old light bulbs, you have the dexterity for this. There are no delicate ribbon cables to disconnect, no thermal paste to reapply. It's genuinely designed for normal people to handle.
What's the worst that could happen?
Realistically? You might strip a screw if you really over-tighten it (which is why we said hand-tight only). The SSD might not work if it's incompatible, but you'd just return it. You're not going to void your warranty or brick your console—Sony officially supports this upgrade.